Huh? What is that, you say? Two wedding posts in a row?! Heck, yeah! High fives all around.
Our wedding venue was a beautiful, 1920s historic building with double doors at the entrance. They had some fake flower wreaths hanging on the doors when we first visited the venue. There was no way they were staying for our wedding.

Photo credit: Wauwatosa Woman’s Club
In order to nix the current wreaths, I had to come up with something to take their place. I couldn’t just leave the doors naked! Our wedding had a peacock theme, so whatever I came up with had to incorporate the feathers.
Here’s what I came up with, complete with instructions to make some for yourself.
DIY Monogram Peacock Feather Wreaths

Materials:
premade peacock feather wreaths (you could make them yourself, of course, by gluing a bunch of feathers to a wreath form)
papier-mâché letters, one for the bride’s first initial and one for the groom’s
acrylic paint in the color of your choice
paint brushes
paper plate
Sharpie paint pens
ribbon
hot glue gun & glue sticks
Directions:
Step 1: Let’s start out with the wreaths. Our wedding was in May of 2012, but I started making things well in advance (due to how much of our wedding was DIY). I was making my rounds at Michael’s (which went on WAY too frequently in that time period!), and stumbled upon these wreaths at Christmas time. They didn’t scream “let’s celebrate Jesus’ birth!” to me, so I figured I could get away with using them for our wedding. They were originally $25 each, but I had 50% coupons and got them both for $25. Go me!

Step 2: For the initials, use the acrylic paint to cover them in the color of your choice. We chose turquoise since our wedding was peacock/art deco themed (our colors were gray, navy, chartreuse, and turquoise). Allow the paint to dry completely before proceeding to the next step.

Step 3: Using the Sharpie paint pens, draw peacock feathers on each letter. This is, of course, optional, but I thought the letters looked too plain without them.
Step 4: Attach the letters to the center of the wreaths using ribbon and hot glue. Add a loop of ribbon to the back of the wreath for a hanger.
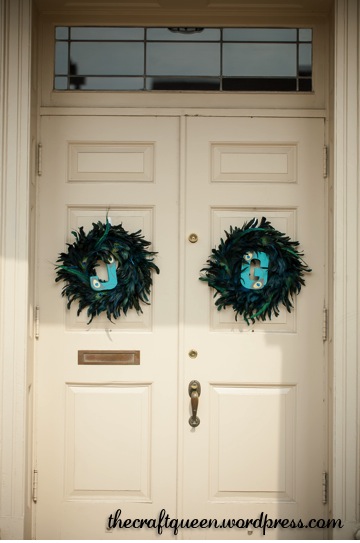
Step 5: Admire the finished products!

I was so excited when we got to the venue and saw these beauties hanging on the front doors. Didn’t they look frickin’ fabulous?
I hope you enjoyed today’s post, stay tuned for more DIY wedding projects!

Photo credit: Laura Zastrow Photography
XO,
Gabriella
Remember to follow me to see all my latest posts, and don’t forget to share me with your friends!
