Disclosure: I am an affiliate of The Home Depot, and this post contains affiliate links to homedepot.com. I am not compensated to provide opinion on products, services, websites and various other topics. The views and opinions expressed on this blog are purely mine. If I claim or appear to be an expert on a certain topic or product or service area, I will only endorse products or services that I believe, based on my expertise, are worthy of such endorsement. Any product claim, statistic, quote or other representation about a product or service should be verified with the manufacturer or provider.
Hey, remember back in September when I showed you a sneak peek of the IKEA Expedit shelving system makeover? It’s FINALLY finished!
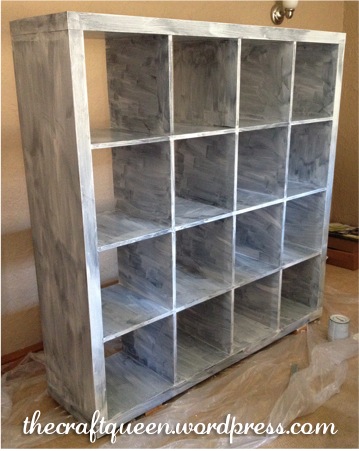
To refresh your memory, this is what I started with:

Now, I am happy to present you with the final product!
Boom goes the dynamite:

I cannot tell you how excited I am that it’s finally done. Well, I guess I did just tell you…I’m excited that it’s finally done!
If you want to accomplish something similar, you’re in luck; I’m going to tell you how to do it.
IKEA Expedit Makeover
Materials:
Assembled IKEA Expedit shelving system
Plastic dropcloth
Zinsser Bulls Eye 1-2-3 Primer
BEHR Premium Plus Ultra Paint in Dark Pewter
Paint brush
Foam roller
Small paint tray
Fine/Medium sanding block
1/4″ sanded pine plywood, cut into 13″ squares (8 total)
Minwax Pre-Stain Wood Conditioner
Minwax Wood Finish in “Early American”
Clean rags (old t-shirts work well)
Rubber gloves
16 hinges (two per door)
8 cabinet pulls
Gorilla glue
Drill and drill bits
Phillips head screwdriver
Directions:
Step 1: First, make sure to lay down a drop cloth to protect the floor in your work area. Wipe down the cabinet with a mild cleaner. You don’t want any dust or dirt or your finished paint job will look (and feel) gritty!
Step 2: Add a thin coat of primer to the entire cabinet. Allow to dry for at least an hour. (I used this Zinnser primer because it sticks to ANYTHING, even veneers, without having to sand the surface first. Sounds good to me!)
Step 3: Lightly sand the first coat and wipe down with an old rag. Again, make sure you get rid of all the dust.
Step 4: Add a second coat of primer. Trust me, you want two coats if you’d like the top coats of paint to stay put! Allow the second coat to dry for a full 24 hours.

Step 5: Lightly sand the cabinet and wipe it down. You’ll start to notice a pattern here…
Step 6: Add 2 coats of the Behr paint, making sure to sand after the first coat. I used the foam roller for these coats, just to make sure everything was nice and smooth.

Step 7: Sand all the edges of the 8 cabinet doors. They don’t need to be perfectly smooth, but you don’t want to give yourself a splinter every time you open one of the doors.
Step 8: Choose which side will be the front of each door, and apply a coat of pre-stain using a clean rag. The pre-stain is optional, but it really helps with an even coat of stain and prevents blotches. Allow to set for about 5 min, and wipe off excess stain with another clean rag.
Step 9: Apply the stain and allow to set until the desired color is achieved; I had mine on for about 10 minutes. Wipe off excess stain with a clean rag, and allow doors to dry for several hours.

Step 10: Measure and mark for a hole to mount the cabinet pull. I placed my pulls at the center (6.5″), 1.5″ in from the edge. Drill a hole using the suggested drill bit (it should say on the package). Attach the cabinet pulls.
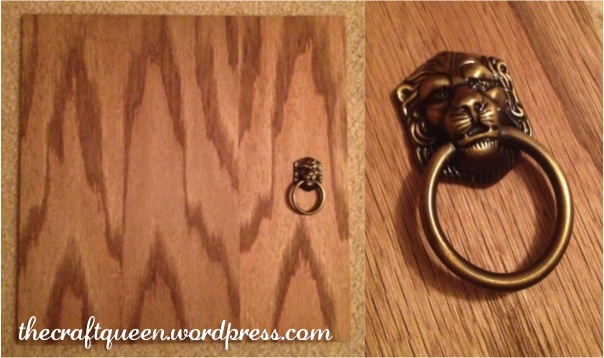
If you like the pulls I used, you can get the same ones
here.
Step 11: Measure for placement of the hinges. I placed mine 1.5″ from the edge (on each side). To attach the hinges, I ended up using gorilla glue; I couldn’t find screws short enough for the 1/4″ plywood (the screws need to grab the wood without going completely through). If you decided to go this route, make sure to either clamp down the hinges while they dry or stack some heavy books on top. I used a bunch of old textbooks and it worked like a charm. Allow the glue to dry for several hours.
Important: You will need to purchase inset hinges for this project. I used a set similar to
these.
Step 12: Pre-drill holes for the hinges, and attach the cabinet doors. Make sure to leave a small amount of room for the doors to swing in and out (I used a straight-edge to set the doors a tiny bit above the shelves so there wouldn’t be any friction).

That’s it! I had the cabinet painted and sitting in my living room for the longest time, but I’ve been so busy the rest of the materials just sat around for the past two months. With Thanksgiving coming up (which we are hosting), I decided it was about time to finish up this project once and for all…especially since it provides us a with a bunch of hiding places for all our junk. Out of sight, out of mind, right?
Here’s a “before and after” to really convey the transformation:

I hope this project has inspired you to breath new life into your favorite piece of furniture. Here’s to a great start to the week!
XO,
Gabriella
Remember to follow me to see all my latest posts, and don’t forget to share me with your friends!
Affiliate link:

Amazing job!
LikeLike
Thank you!
LikeLike
Oh my gosh, it’s amazing! It doesn’t even look like the same piece of furniture! You must be thrilled! 🙂
LikeLike
Oh, I’m floored! I especially like that I have a place to shove all my junk that I swear I’ll go through “eventually”. Thanks!
LikeLike
Boom indeed! This has got to be one of the best Ikea hacks I’ve seen in a while! Great job!
LikeLike
Thank you, that means a lot. 🙂
LikeLike
Hi, looks fab! How big a tin did you use of the Zinsser primer for the 2 coats?
LikeLike
Thanks! I used a quart and still had a little bit left over. It really goes a long way!
LikeLike
Looks great! I’m thinking of doing the same but have read that I should sand before I prime – just wondering how yours is holding up – have you noticed any peeling at all or do you think I can avoid sanding too..?!
LikeLike
Thank you! You can absolutely sand before you prime, but the whole point of using Zinnser primer is that you don’t have to. I would definitely recommend it if you plan on using a different primer. The cabinet only has a few nicks on it from moving it around a bunch, but the paint has held up pretty well overall. Hope that helps!
LikeLike
This looks great! I’m planning on trying this tomorrow. Just one question- did you have any problems with the primer and/or paint drying? I purchased the same brands/products as you, but I’m a little concerned about the paint drying completely.
LikeLike
Thank you! I did not have any issues with the paint drying, but I did let the primer “cure” for a full 24 hours before I did the color coats, and again after all the paint was finished (before I moved it to it’s final location).
LikeLike
I have read of lot of tutorials where people are saying let it cure for a couple weeks before using it or it will chip… are you finding that to be a problem?
LikeLike
I let it dry for a full 24 hours, and don’t remember there being any issues. It did scratch (my fault, I hit it by accident), but it fixed pretty easily. I should note that we painted it in the room where it was going to stay, so we only had to move it a few feet to it’s final spot. If you have to move it to another spot in the house, I would maybe let it cure for a bit longer.
LikeLike
What color gray Paint did you use?
LikeLike
Never mind I see it! Looks fabulous!
LikeLike
Thank you! 🙂
LikeLike
This looks great!!
how long did you let each coat of behrs paint dry before sanding? Thanks!
LikeLike
Thank you! I believe it was a few hours.
LikeLike
Pingback: 25+ IKEA Kallax or Expedit Shelf Hacks - Hative
Thank you so much for this DIY tutorial. I have a question though. I have never updated any piece of furniture. Why do you need to sand it after each layer of either primer or paint?? Once again, I know nothing about this, this steps sound a little weird.
LikeLike
I think if you plan on painting with a brush, sanding in between coats helps the final finish to be nice and smooth (i.e. not a ton of brushstrokes). Thanks for commenting!
LikeLike
Pingback: 36 DIY Furniture Makeovers - DIY Joy
Pingback: Amazing 33+ DIY Furniture Makeovers - Natural Living Hub
Pingback: DIY Furniture Makeover Projects
Pingback: [Inspiration] #1 Ikea Hack : La gamme KALLAX | Les Bricoles de Mel
Pingback: IKEAの”KALLAX(カラックス)”でDIY!家具や収納のアイデア6選。 | MAKIT!
Reblogged this on beforewegoblog and commented:
A great idea for all the expedits I gave in the house.
LikeLike
I know this is an old post but I just got a black 8 shelf unit like this and would like to paint it. How has the paint on yours held up? I intend to use the shelf for toy storage for my kids, so I’m looking for the most durable paint job possible. How do you think this method will do?
LikeLike